Documentation
PLC: Siemens, Vipa, Logo
Description
Programmable Logic Controllers (PLC) are independent electronic assemblies for controlling machines and systems. These work independently of a PC. The functions for control and regulation are stored directly in the PLC.

The following devices are supported by IP-Symcon:

Due to the fact that PHP offers integers as the largest integer value, DWORDs (unsigend ints) can be read in IP-Symcon, but they are mapped to integers, which means that only the lower 31 bits can be evaluated.
Content
- Integration in IP-Symcon
- S7 Connection Configuration
- Logo Connection
- Logo Configurator
- Example with TIA Portal
- Example with Logo Soft Comfort
- Data types
- Logo VM-Addresses
Integration in IP-Symcon
The Siemens PLCs can only be integrated via Ethernet connection.

The support of MPI and ProfiBus via LIBNODAVE is discontinued since version 4.0

With newer S7 (1200/1500) the "Optimized block access" attribute must be deactivated. Further information can be found HERE
S7 Connection Configuration
The connection is configured via "TIA Portal" software (Totally Integrated Automation) from Siemens.
The following settings must be made.
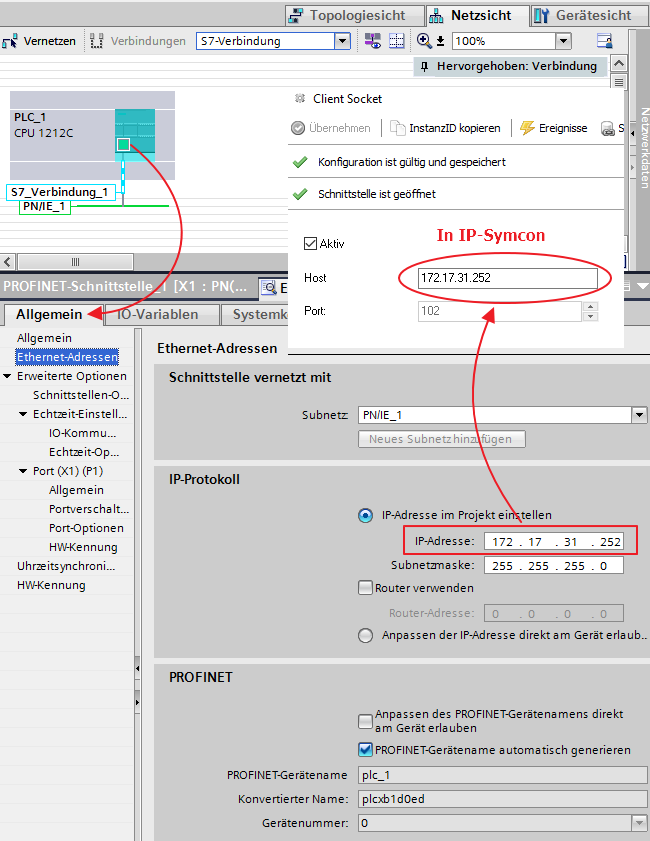
- The IP address must be entered in the PROFINET interface (see screenshot)
- PN/IE subnet must be connected
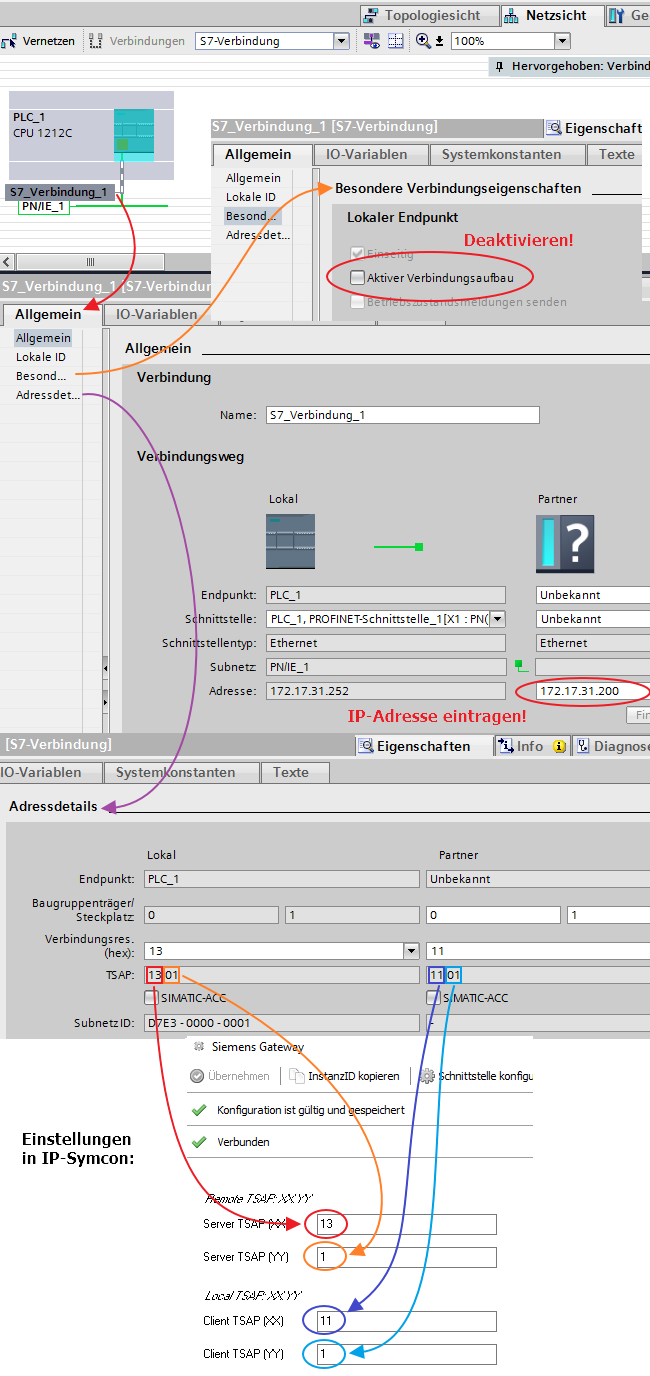
- S7 connection to PROFINET must be inserted and the following points configured (see screenshot)
- Connection data must be entered in IP-Symcon (see screenshot)
PROFINET Interface
S7 Connection
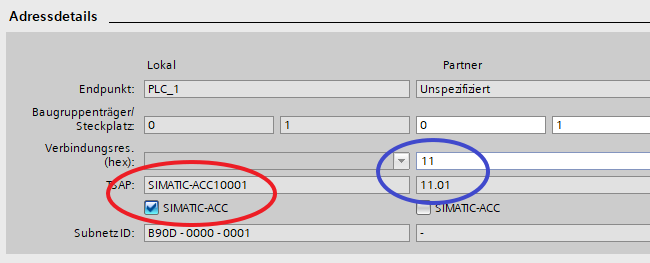
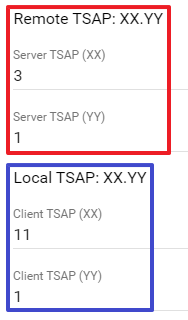
S7 Connection Secure
If a Siemens PLC with additional security settings is used (e.g. S7-1517f), a connection can only be used with activated SIMATIC ACC on the PLC side. This means that the "SIMATIC-ACC" option must be activated for the local TSAP in the S7 connection of the PLC. This results in the remote TSAP 03.01 in the gateway configuration in IP-Symcon.
Logo 7/8 Configuration
The configuration of the PLC and the gateway must be set up as follows.
Configuration via LOGO!Soft Comfort 8.1.
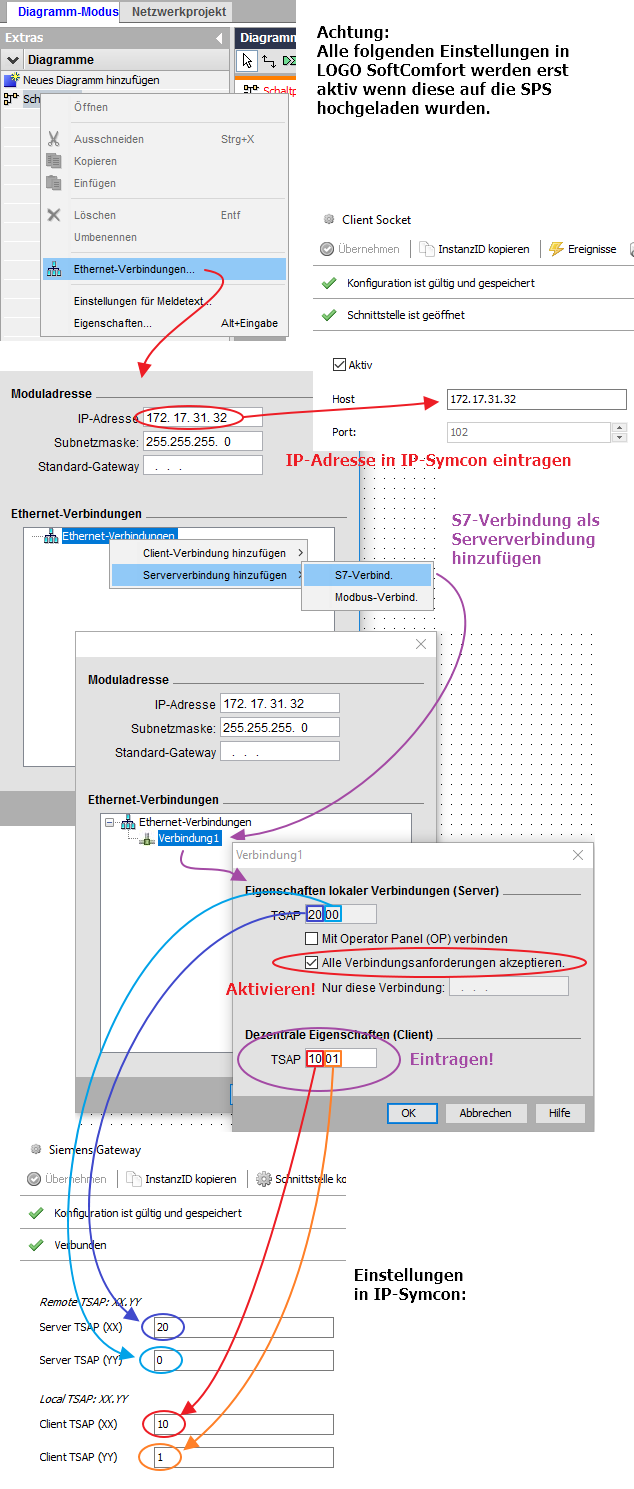
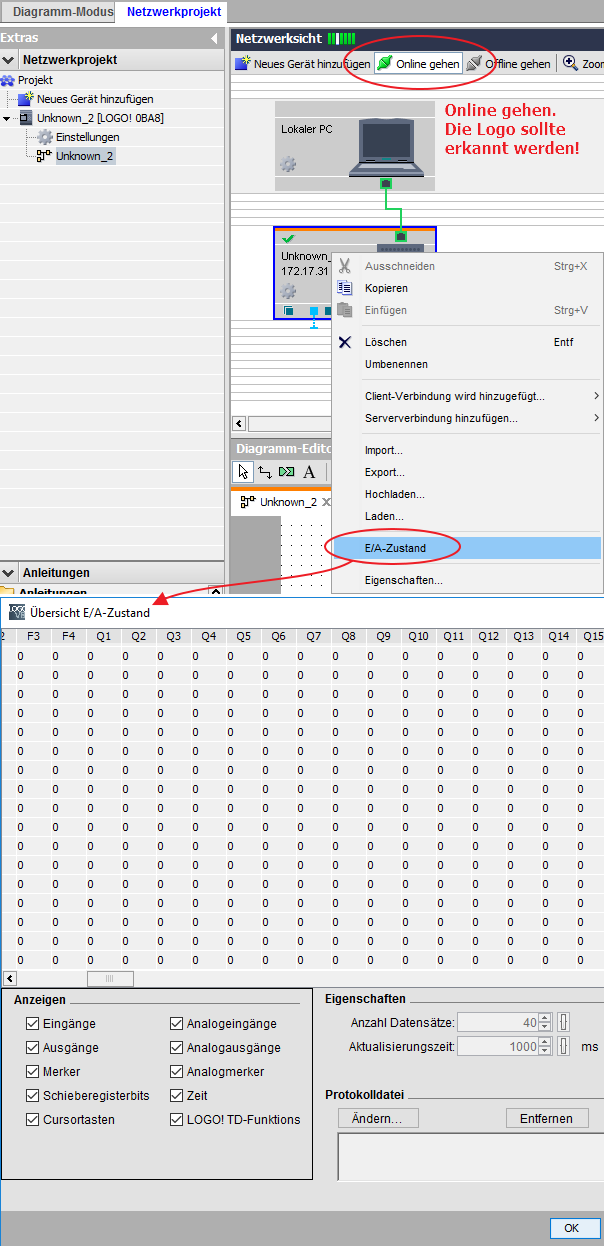
The functions can then be tested. For a simple overview of whether everything is working correctly, the SoftComfort software offers an overview of the I/O states.
This can be called as follows.
Logo 7/8 Configurator
If the Logo has been integrated properly, the respective memory addresses can be created as an instance via the Logo 7/8 Configurator. To do this, the respective input, output or marker must be selected and "Create" clicked on.
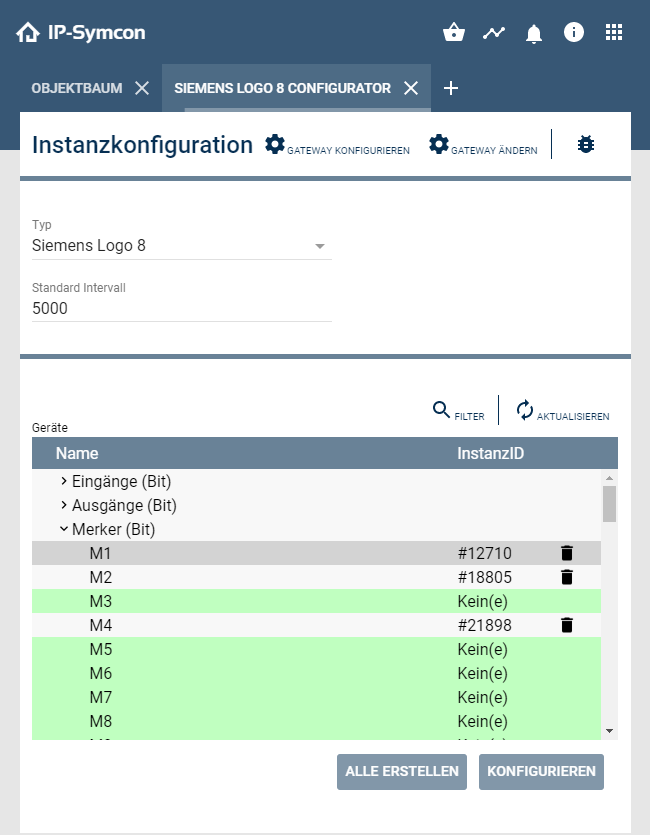
As soon as a module is created in the configurator and the configuration button is pressed, a new dialog opens.
New instances are created in the object tree in the main category. These created instances can then be renamed accordingly and sorted elsewhere. It is also possible to call up the respective instance configuration via "Configure" in the configurator.

Example with TIA Portal
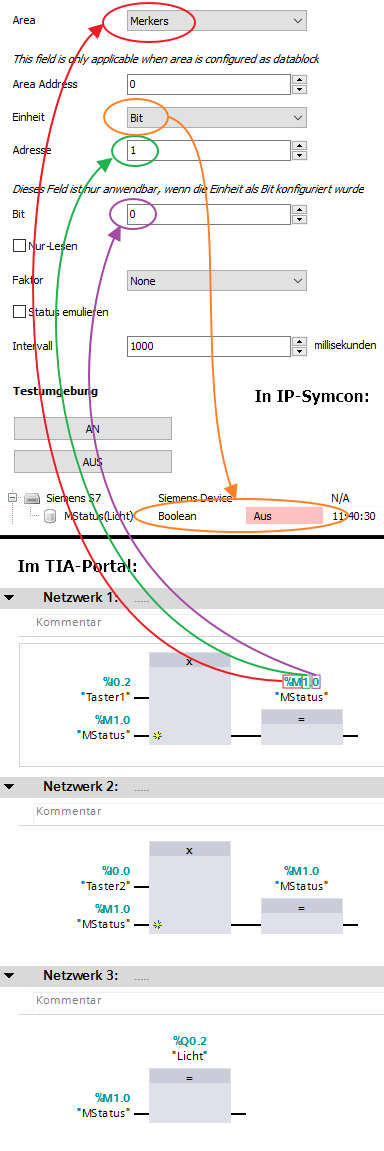
This example on the S7-1200 reflects 2 buttons, which should switch a light on/off independently of each other. At the same time, it should also be possible to control the light via IP-Symcon.
- Configure Main (OB1) as on the screenshot. (See screenshot)
- Load the program onto the PLC and start it
- Add "Siemens S7" instance in IPS-Symcon
- Configure the configuration page of the "Siemens S7" instance (see screenshot)
- Address and bit result from the TIA Portal (see screenshot)
- The type is specified under the "Area" field (see screenshot)
- The type of variable in IP-Symcon is specified via unit (see screenshot)
- The marker status is queried at the entered interval. (See screenshot)
- The test environment (ON/OFF) can be used to test directly whether the marker is switched correctly
With the XOR circuit and the marker, it is possible to switch over with a button and IP-Symcon will notice the variable change. Thus, IP-Symcon always shows the status of the light without having to use a separate variable to read out the PLC output. It is also possible for IP-Symcon to switch the light directly via the marker.
Better results can be achieved in this example if an AND (edge) is placed in front of the respective XOR to get just one cycle. However, whether this is required must be tested on site and is not included in this example.
Example with Logo Soft Comfort
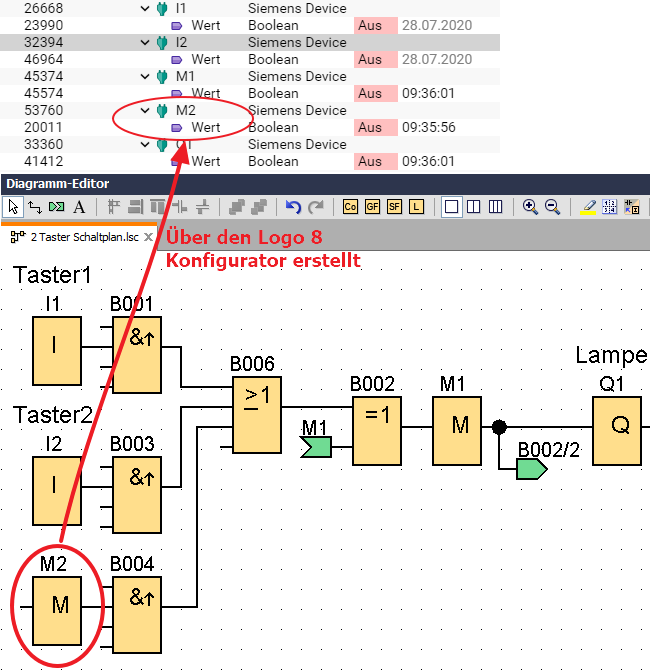
This example on the Logo 8 reflects 2 buttons, which should switch a light on/off independently of each other. At the same time, it should also be possible to control the light via IP-Symcon.
- Configure 2 button circuit diagram as shown on the screenshot. (See screenshot)
- Load the program onto the PLC and start it
- Add instance in IPS-Symcon "Logo Configurator" and configure interface as described above
- Create the desired variables using the configurator
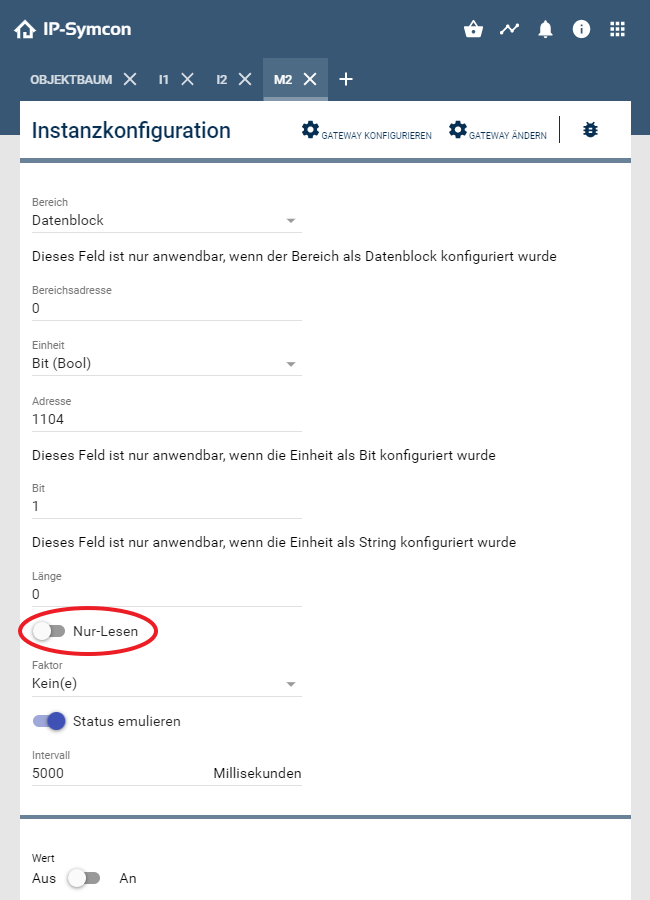
- Deactivate the "Read only" option for switchable marker M2
- The type of variable in IP-Symcon is specified via unit
- The marker status is queried at the entered interval. (See screenshot)
- The test environment (ON/OFF) can be used to test directly whether the marker is switched correctly
With the XOR circuit and the marker, it is possible to switch over with a button and IP-Symcon will notice the variable change if the Q2 is set up. It is also possible for IP-Symcon to switch the light directly via marker M2. This is not possible via marker M1 because the logo does not support this in this configuration. Marker M2 acts as a switch in IP-Symcon and as a button in the Logo.
Data types
| Data type | Sign | Bit | Name IP-Symcon |
|---|---|---|---|
| BOOL | unsigned | 1 | Bit |
| BYTE | dependent | 8 | Char/Byte |
| WORD | dependent | 16 | Short/Word |
| DWORD | dependent | 32 | Integer/DWord |
| SINT | signed | 8 | Char |
| INT | signed | 16 | Short |
| DINT | signed | 32 | Integer |
| USINT | unsigned | 8 | Byte |
| UINT | unsigned | 16 | Word |
| UDINT | unsigned | 32 | DWord |
| REAL | signed | 32 | Real |
Logo-VM-Addresses
The Logo has reserved fixed memory addresses in the VM memory above the 850th byte for inputs/outputs and markers.
These vary depending on the model (Logo7/8).
If the logo is to be read out with IP-Symcon, it is helpful to know these addresses.
A complete list can be found here: Logo-VM-Addresses