Documentation
FS20
When creating the instance you have three choices for the FS20 system:
| InstanceName | Purpose |
|---|---|
| FS20 Receiver | Sockets, dimmers, canopy control, … |
| FS20 Sender | Motion sensor, … |
| FS20 Remote control | Multi-channel remote controls, push-button, transmitter |
If you have not set up your device, please follow the steps on this page: embed devices
FS20 receiver / configurate sender

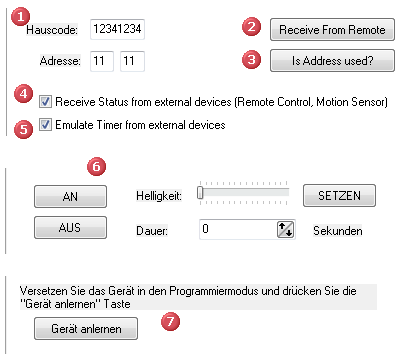
- You can enter and take over the house code manually. Possible characters: 1-4
- You can receive the house code from another transmitter (e.g. a remote control).
- You can check if the address is already in use by another instance.
- When activated, the instance receives data from FS20 transmitters and updated accordingly, the state variable.
- When activated, the instance receives data from FS20 transmitters, evaluates the timer data and emulates the state of the timer (e.g. ON for 30sec).
- Once the new settings have been applied, you can test it by sending on / off telegrams. When transmitting the value in the duration field is rounded to the nearest possible time that can evaluate the FS20 system.
- Once the new settings have been applied, you can teach one FS20 receiver (eg switch socket). You must put this in the "learning mode" and program it within the next 15 seconds by pressing the teach button.
FS20 configurate remote control

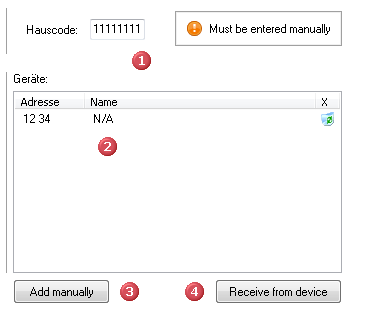
- You must enter the house code by hand before you can continue the configuration. Possible characters: 1-4
- The list shows already learned buttons of the remote control.
- If you know the address, you can enter it manually. Possible characters: 1-4
- If you do not know the address, you can receive it from your remote control. Please note that you must have entered the house code and that it must be saved via the "Apply" button.
Available status variables
| Variable | Function |
|---|---|
| Status Variable | Displays the status of the device |
| Intensity Variable | Shows the dim value of the device in %. Note that the values 0-16 are used internal, if you load in the variable in your scripts. |
| Timer Variable | The time, in seconds, the timer runs. Point 5 must be enabled in the configuration, so this variable is evaluated by IP Symcon. (It appears the total received time - not the time to maturity.) |
| Data Variable | Displays the internal received status code. |
Available status codes:
0-16 => 0% – 100%
    17   => on, old value (corresponds to value  11 at PIRI)
    18   => swap
    19   => dim up      (Simple channel number)
    20   => dim down    (Simple channel number)
    21   => dim up/down (Double number of channels)
    24   => PIRI; off for the ON duration, afterwards on
    25   => PIRI; on, 100% for the ON duration, afterwards off
    26   => PIRI; on, old value for the ON duration, afterwards off
    30   => PIRI; on, 100% for the ON duration, afterwards old state
    31   => PIRI; on, afterwards old state for the ON duration